View RSS Feed

baker.shawn

DIY LED fixture of fun (SOL rip off) part2

Rating: 2 votes, 2.50 average.
LINK TO PART 1 (INTRO) -> http://www.reefaddicts.com/entry.php...n-(SOL-rip-off)
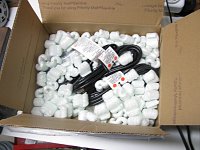
Everything arrived today!!!!!!!!

Click image for larger version

Name:	IMG_0903.jpg
Views:	372
Size:	102.7 KB
ID:	4585 Click image for larger version

Name:	IMG_0905.jpg
Views:	344
Size:	77.7 KB
ID:	4584 Click image for larger version

Name:	IMG_0904.jpg
Views:	360
Size:	79.6 KB
ID:	4586 Click image for larger version

Name:	IMG_0902.jpg
Views:	352
Size:	103.7 KB
ID:	4583 Click image for larger version

Name:	IMG_0906.jpg
Views:	336
Size:	100.9 KB
ID:	4587
My initial thought so far:
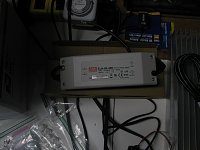
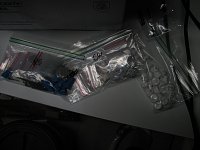
1) These LEDs are REALLY small I expected them to be much larger, same with the drivers an optics
2) Rapid led gave me adhesive rather than thermal grease :/ wonderful....which makes me wonder if they read my special instructions and gave me the XP-Es vs XR-Es (anyone know how I can tell, I don’t want to drive them wrong)
3) I got 4 drivers and 3 power cord :/ great... but that’s okay I’m going to run both blues on the same plug, and the whites on their own
4) Lastly I’m not happy about having to pay 50bucks worth of customs. I understand it’s just sales taxes but FML I could of done without, but that’s what I get for being Canadian and getting my free health care
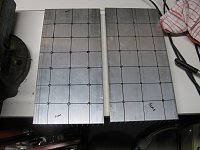
I’ve already used a sharpie to mark out where the LED’s are going, and tested each led to make sure they all work tomorrow I’m going to get my plastic washers and self tapping screws. I may or may not begin drilling the heatsinks, I may not have time I have class 8-10 then 4-8
Click image for larger version

Name:	IMG_0907.jpg
Views:	148
Size:	101.6 KB
ID:	4582

Submit "DIY LED fixture of fun (SOL rip off) part2" to Digg Submit "DIY LED fixture of fun (SOL rip off) part2" to del.icio.us Submit "DIY LED fixture of fun (SOL rip off) part2" to StumbleUpon Submit "DIY LED fixture of fun (SOL rip off) part2" to Google

Categories
Electrical , ‎ Lighting , ‎ DIY projects

Comments

  1. Heathd's Avatar
    Looks like you are off to a good start. I look forward to the rest of the build, and maybe, an idea to copy from....
  2. TBDuval's Avatar
    Why would you not want the XP-E's? They have more output. Also, IIIRC the XP-E's and take more current. I think all and all the XP-E's are the way to go right now. Let me ask, they dont make XP-E in white so are you using XP-G's?
  3. gist41980's Avatar
    Skip Class! Look at all that fun stuff! Get to work on the lights! Just kidding, go to class, then stay up all night playing with the lights!
  4. baker.shawn's Avatar
    TBDuval- i think you need to reread that, iasked for the XP-E VS the XR-E

    I managed to get all the holed drilled and tapped, it was such a pain in the ***, those self tapping screws dont go in very easy. i must have stripped well over 30, tomorrow im getting the thermal grease and mounting all the LEDs, then i get to wire everything up!
  5. marks69's Avatar
    i have to come over and see when you get this together. i have wanted to do a light up for my 110g tall and my 90 planted tanks.
  6. melev's Avatar
    The reason self tapping screws aren't working well is because the aluminum is so thick. Very thin sheet metal allows those screws to work perfectly, but thicker stock like your heat sink or my electrical rack - well, you know the answer to that now.
  7. baker.shawn's Avatar
    all the LEDs are now screwed on to the heatsink and all the soldering is complete i will update a part 3 tomorrow, now im just trying to figure out how to wire everything (powercords, drivers, pots) and have everything look neat and tidy. im thinking im going to use a small rubermaid to keep all the drivers and wiring in. an one know if the drivers get warm?