pepper'scove
Stand and Sump Build - Research and a learning curve

by
, 04-09-2011 at 05:44 PM (5437 Views)
Over the past few months I have taken my first faltering forays into saltwater aquarium keeping. To say that it has been speed bump free would be... a lie. Among other things I have cracked my tank and killed some of my livestock, but I have learned a lot and am looking forward to the future. I'm not proud of some of it, but take it or leave it I'm learning and I wanted to share my most ambitious project with RA. I hope you guys get something useful out of this blog entry and can learn something from my experiences. I know I have benefited from being a member here!
The first thing I learned about RA is that it's very picture centric. Therefore, starting with my sump project I will aim to give a very visual representation of what I have been up to and where I plan to take the hobby. I'm going to start by talking about my sump build and end by demonstrating the design for my custom aquarium stand.
To put it mildly some people thought I was crazy when I started talking about my plans to build my own aquarium sump and stand. I had a BioCube14, no previous experience in fish to speak of, and I didn't know that much about saltwater at all. When I said I was going to build a 29 gallon sump people thought I was nuts. It seemed backwards. But to me, a budding Mechanical and Aerospace Engineering student at WVU, it seemed like the coolest part of the project. The sump was a place where I could manage everything, I could hide unsightly tank components, install a worthwhile protein skimmer, and increase the amount of evaporation my tank could experience before I ran the risk of running a pump dry or worse. It also would make my system more stable, etc., etc., etc.
So off I went. I had done some looking on Melev's Reef and discovered the idea about bubble traps and the basics on how to plump a sump. With that in mind I set off to design a sump that would incorporate a protein skimmer and a refugium. So my initial design included a refugium and a suitably sized section for the skimmer I had selected at the time.
I made some 3D computer models and decided I had it all right, but then I discovered the Vertex IN - 180 at a LFS near my parents' house. I decided that I would purchase it since the stand I was planning to build would be capable of holding a 90 gallon tank. Some said it wouldn't work, others said it would. Even Marc cautioned that such a large skimmer might not efficiently pull skimmate out of my system since I would initially only have a BioCube 14 holding livestock. Nevertheless I went ahead and the final design at that stage looked like this:
Attachment 4709Attachment 4710Attachment 4711
But that design had a lot of inherent issues. The foremost of them was that, with the addition of the Vertex skimmer, I no longer had room for a refugium. Also, as a 29 gal. tank it made for an awkwardly sized sump. It wasn't all that long or wide for how deep it was and that would've made some of the equipment hard to access and service. Lucky for me PETCO decided to hold a $/Gal. sale and things started to look up.
The stand I was planning would perfectly accommodate a 40 gallon breeder and I had purchased the unused 29 gal. aquarium less than 30 days prior from none other than PETCO!! So I returned the 29 gal. tank and ended up taking $18 and a brand new 40 gal. breeder tank home with me!!! I did a fairly quick redesign on the sump and came up with a fairly similiar design with a few exceptions. I was now able to incorporate a refugium section, and I also had a slightly shorter tank so access would be easier. Here are pictures of the build from start to finish along with explanation.
Attachment 4716
This picture shows the first piece of glass being siliconed into the tank. I held it in place at the top with some clear duct tape I had on hand. That way It would be secure, but wouldn't be in the way when I went to lay down a line of silicone. It would've been nice to have something to hold the baffle at the bottom, but I wouldn't have been able to lay down a solid bead of silicone. In the end the tape was more than sufficient.
Attachment 4712Attachment 4720Attachment 4714
Between each bubble trap baffle I left a one inch gap (as can be seen in the 3D drawings above). To ensure I got it right I measured from the backside of the adjacent piece of glass and put down a sharpie mark as shown here. I made sure that I did this in such a way that the glass would cover the mark when it was put down. To get the spacing right at the top I used some handy finish sanding sponges I had on hand (that's why they were handy :P) as shown in the last of the three above pictures.
When applying silicone to the middle baffle I had to find a way to adequately support it so I opted for the sponges again and something a little bit harder. Since the sanding sponges were one inch tall they worked great, except they weren't quite as precise as I wanted. So after measuring and trying the sponges and measuring again I decided to add some value to my project:
Attachment 4721Attachment 4717
I measured a stack of quarters, turns out 14 was just about perfect, and placed them underneath the middle baffle in the bubble trap. However, I decided that I would leave the sponges there in case the coins got bumped and slid off of one another. I didn't want any glass breaking on me!!
That meant I had to come up with a way to ensure the glass was perpendicular to the tank floor without the aid of my sponges as spacers. So I got out a small level/square combo and taped it to the middle baffle as shown (I apologize if it's hard to see, I used clear duct tape... :P):
Attachment 4715Attachment 4722Attachment 4724
Before I installed the third baffle I waited 24 hours and did a water test to ensure that the first baffle was water tight. I would recommend that in the future you have the patience to install the first baffle, wait 24 hours, THEN do a water test and continue on with the project. My first baffle leaked a little bit and I had to drain the water and carefully reapply the silicone to the side of the glass where the skimmer was sitting in these pictures. If I had waited to install the second baffle I would've been able to attack the problem from both sides. After a second wait period I filled the skimmer section with water for a second water test and everything checked out!
Next I needed to install the third baffle:
Attachment 4718
This was accomplished in the same manner as before and again a 24 hour wait was performed before I water tested to make sure that no water leaked out from between the 1st and 3rd baffles.
While I waited for the silicone to cure at each baffle I had another project to work on. My Vertex skimmer was designed to operate most effectively in water that was between 6 and 9 inches deep. I decided that I wanted to run it at 9 inches deep, but my baffles were 11 inches tall for the refugium section. That meant I needed to build a stand for it to sit on. I decided to use egg crate and PVC as shown below:
Attachment 4725
I "glued" the PVC legs to the egg crate with a good amount of silicone. I believe that I should have used super glue or epoxy since I have had trouble with the legs falling off when I service the skimmer section. Initially I was worried that, even using the silicone as a glue would cause excessive vibration, but I have not found that to be the case. However, if I were to use super glue or epoxy instead of silicone I would put a small bead of silicone around the bottoms of the legs to acts as a damper since the super glue would make the stand much stiffer and more likely to vibrate.
The rest of the project was finished in a similar fashion with the exception that the glass I used for the refugium was 15 inches tall. Some have been surprised at that height; however, the reason for the excess height is that I plan to install a DSB in the refugium. To ensure that no methane gas bubbles escape the DSB in the refugium section I opted to put a second bubble trap in the sump. This took up space and I don't particularly like it, but I think it is necessary as an added precaution against some of the evils inherent to a DSB. As another note I wouldn't mind hearing you guys debate whether or not this would work. If methane were to be released it would likely be dissolved in the water already and it may not have sufficient buoyancy for the bubble traps to be effective. Happy debating!
Also, as shown in the 3D drawings above I added a slightly wider section to the end of the bubble trap on the skimmer section (see picture of final project to get a better idea). To do this I simply siliconed in a section of egg crate. I used an edge section to ensure I would have a good amount of surface area for the silicone to adhere to. This section was made 1.75" wide instead of the initial plan of 1.5". The reason for that is that I was afraid I wouldn't be able to get bioballs down in there effectively since most of them are 1.5" in diameter - although some are 1 - 1/4" in diameter. This proved to be a good decision and it's the distance I would recommend to anyone trying to do the same thing.
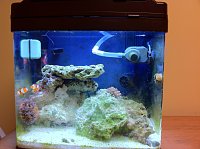
Here's a picture of the final product complete with water, bioballs, and some of the plumbing:
Changes I would make:
Plumbing - I had planned to have the pump feed the refugium section. However, it causes WAY more head loss due to frictional losses in the water flow. Instead I now plan to let the water drain down from the tank and route it into the refugium section and the skimmer section. That means that instead of needing one filter sock holder I will need 2, but that seems like a small sacrifice.
Silicone - I made the idiot mistake of using GE Silicone II. Since I was building inside I decided it would be safer to use than GE I and my LFS owner told me he had used it before and had no problems... However, I discovered that it was quite problematic and will be remaking my sump this summer to remove it. With the remake I will be using GE I. Use the link below to see why I know that's safe and the reason I had to find this out. NOT a happy story and yet another one related to misinformation (although a simple reading of the box would've properly informed me...) given by my LFS guy.
http://www.reefaddicts.com/entry.php...fter-breakdown
Project Materials:
1 - 40 gallon breeder tank
4 - 1/2" Glass baffles sized 17 - 3/4" by 11" (the gaps were a bit big so you may want to experiment with sizing)
3 - 1/2" Glass baffles sized 17 - 3/4" by 15" (the gaps were a bit big so you may want to experiment with sizing)
1 - 2'x4' Section of Egg Crate (Look in the lighting section of your local home improvement store)
1 - 1/2" PVC pipe 4 foot long (leftover from another project)
1 - Bag of Bioballs
2 - Tubes of Silicone (USE GE-I OR AQUARIUM SAFE SILICONE ONLY!!!!)
1 - Roll of duct tape
1 - Appropriately sized pump and appropriate plumbing specific to system needs (Please don't copy this part. I'm not going to do it this way anymore. It will be more efficient to plumb the system as I discussed briefly above)
Project Tools:
1 - Square
1 - Sharpie Marker
1 - Dremel (I used it to cut the eggcrate before I realized I could use pliers to break it and do a neater job)
1 - Set of pliers (see note above)
1 - Caulking gun
2 - Sanding blocks (used as spacers since they were 1 inch thick)
28 - Quarters, two stacks of 14 (They work best to hold up the middle baffle of a bubble trap and are almost perfectly 1" high)
Aquarium Stand Build
Now for my stand build. I am going to be sharing a fairly simple step by step build process with all of you. Without my 3D design software I'm certain I would've royally messed up at several points, but I'm proud to say that because of it there were no serious mistakes made. One place this really helped was in determining interior height and some stud spacing near the skimmer.
Here is a fairly step - by - step set of diagrams and dimensions:
My plan was initially not to cover the sides with anything, but that changed and will be reflected in my actual build photos. However, the final diagram anticipates the way I eventually covered the stand so pay close attention to details like 22/32 of an inch. It might seem random, but it's the standard thickness of high quality 3/4" ply-wood. Same thing goes for 2" x 4" 's. They're actually 1.5" x 3.5". Two by sixes share the same trait and are really 1.5" x 5.5". No need to get more technical than that, just the way it is so keep that information in mind when trying to decipher my diagrams.
And here's the promised cut list and the needed pieces that you will have to pick up at the lumber yard or Lowe's/Home Depot:
2 x 4 (and 2 x 6) Piece Nomenclature, Dimensions, and Quantity
Piece Name
Dimensions
Quantity
Frame_Front_6by
2x6x 48
1
Frame_Side_48Long
2x4x 48
3
Frame_Side_18Short
2x4x 18
15
Vertical Corner Support
2x4x 36
4
Corner Support Short
2x4x 29
5
Front Support
2x4x 27
2
Front Support Cut Out
2x4x 29 (See diagram for Cut Out Size)
2
2x6 Ordering Needs
Length (feet)
Quantity
Price
8
1
$4.98
Total (w/ Tax)
$5.28
2x6 Cut List Order:
Cut 1 8 (eight footer) into Frame_Front_6by
2x4 Ordering Needs
Length (feet)
Quantity
Price
8
10
(Not Available) Figure a 10 ($3.59)
10
7
$3.59 x 7
Total (w/ Tax)
$30.44
2x4 Cut List Order:
Cut 2 8 (eight footers) into 2 Frame_Side_48Long, 2 Frame_Side_18Shorts, and 2 Front
Support
Cut 2 8 (eight footers) into 4 Vertical Corner Supports and 2 Frame_Side_18Shorts
Cut 2 8 (eight footers) into 5 Corner Support Shorts and 1 Front Support Cut Outs (3 per 2by)
Cut 1 8 (eight footer) into 1 Frame_Side_48Long and 1 Front Support Cut Out
Cut 3 8 (eight footers) into 11 Frame_Side_18Shorts
OSB (Particle Board) Piece Nomenclature, Dimensions, and Quantity
Piece Name
Dimensions
Quantity
Interior Floorbed
See SolidWorks File
1
OSB (Particle Board) Ordering Needs
Dimensions
Quantity
Price (w/ Tax)
4 x 8 x 15/32 (4 x 4 if I can)
1
$24.35
Total (w/ Tax)
$24.35
Birch Plywood Piece Nomenclature, Dimensions, and Quantity
Piece Name
Dimensions
Quantity
Top Panel_2.0
See SolidWorks File
1
Birch Plywood Ordering Needs
Dimensions
Quantity
Price (w/ Tax)
4 x 8 x 23/32
1
$34.97
Total (w/ Tax)
$34.97
The above includes the exact quantity of framing wood to build the stand and enough OSB/Plywood to cover the two horizontal surfaces on the stand. In my pictures you will see that I covered the vertical sides as well.
I will be quick in posting these as the library where I'm making this is about to close and I don't have any internet at home except on my iPhone! Maybe I'll post further description or edit my post later if some of you would like that.
Here are the Pictures in fairly chronological order: