

NATUREBATSLAST
Green Your Reef! DIY's On The Cheap

by
, 02-10-2010 at 11:48 PM (8403 Views)
There's nothing more I love than a practical DIY on the cheap. Actually, what I think I love more is putting all the odds and ends saved from where ever to good use. And over the years, not saving odds and ends from various projects or broken equipment usually leads to a trip to a hardware store. In my basement, I'll admit to a couple of coolers full of PVC fittings, a broken protein skimmer, odd lengths of airline, scraps of plexi-glass and I don't want to know how many linear feet of pipe and tubing. Happily, all these scraps get a good chance at re-use and re-purposing. Some reefers are not DIY minded (not many), which is fine. But there is something to be said about the satisfaction from seeing something that you've made and/or fixed.
But for this edition of GR, I choose 6 of my favorite DIY's I've learned from other hobbyists. Some DIY's are really mind blowing, led projects, controller apps, crazy-huge tank building. But these are all on the cheap, 5 under $10 and one under $50. No deep pockets needed, and if your a smaller style pack rat like me (or know someone who fits the bill), you may have most of the parts need lying around.
There are thousands of DIY projects out there. Most reef clubs will have a DIY section on club forums. But, I've only used examples that are local to me, up (and/or over) here in coastal northern New England, Saltwater Aquarists of Maine and The Boston Reefers Society. So my only bias was local, no offense to the DIY universe. I've included the original threads were applicable.
#1 J's Nano Reactor - Cost, nothing.
Lately it seems that almost any inline filter and be re-purposed, namely water filter canisters. Going over to a friends house who has one of the most jaw dropping SPS setups in all of a 40 breeder, I noticed he had an odd prefilter attached to a spare Micro Jet pump. Upon asking, J re-used the clear tube and a cap from a tube of putty. Perforating the cap and the tube with multiple holes, then filling it with the media du jour. Four round pieces of Gutter guard are cut to fit the tube - 2 on each side, and along with a couple bits of filter foam will hold the media within the tube. J uses it to run a mix of GFO and carbon in the display almost sight unseen. Really simple, clean looking and works great.
The nano reactor. Photo Alpine Aquaculture.
#2 Remote Deep Sandbeds Using Buckets - Cost, $2 per Uniseal
I really like this one, super slick and simple, initially offered by Anthony Calfo (I believe). Numerous authors have promoted the nitrate export benefits of a deep sand bed. However, some reefers (myself included) don't like the look of a 6 to 8" sandbed. Using a remote sandbed bypasses the need for deep sand in the display. A member of the Boston Reefers Society devised 2, 5 gallon buckets, filled with sand. Plumbing-wise, it was fed from the sump using a Maxi Jet using Uniseals. I can't ex toll them enough, an instant bulkhead for 2 dollars. Once a hole is cut, the appropriate sized Uniseal is fit into the holes, then PVC is slipped through the Uniseal.
2 Easy fixes for 2 problems. Obey the Uniseal, it's simple and almost bombproof.
Fix the slurping by letting your drain breathe with a few inches of spare line.
#3 Slurping Overflow Fix - Cost, nothing.
With a poor design, I constructed a drain that was unable to "breathe", creating a slurping from air being gulped down the drain. The fix was simple, just a small hole drilled on the topside of the drain with a small piece of 1/4" tubing siliconed in the hole. The silence was instantly noticeable. If your using a durso style of standpipe, the hole is incorporated into the design.
#4 Wicked Cheap Water Volume - Cost, nothing to less than $20.
Want to increase your water volume but only have a small footprint? Try poly barrels. Coming in sizes from 15, to 35, to 55 gallons, it's easy to find a workable size. In addition to a 40 gallon sump, presently I'm using a 55 gallon barrel as extra volume to house 50 pounds of live rock, 5 gallon bucket remote sand bed, two auto top off device switches, 2 heaters, 2 small circulation pumps and my return pump. Plus...a 15 gallon to hold top off water, a 35 for fresh salt makeup water AND a another 55 to pump old water into during water changes. Luckily, I paid nothing for all 4 and actually use one more 55 outside as a rain barrel. Searching or posting on Craigslist.org is a great start, usually in the free section. The measure of a good barrel is pretty simple... will it hold water and what was in it before it was empty? Finding food grade or reasonable lab grade chemicals is probably best, followed with a very thorough vinegar wash/rinse. It's easy to install a bulkhead, and even easier to install a Uniseal.
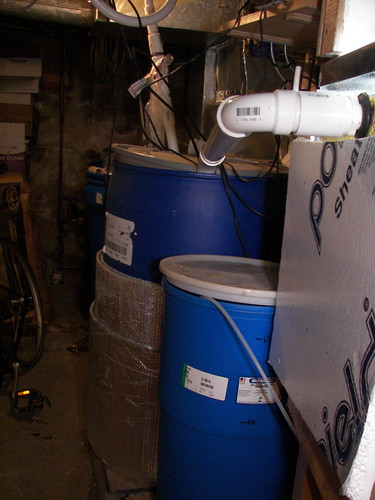
Almost instant extra volume with a small footprint.
Front to back I use a 15, a 55, a 35 and another 55
#5 The 70w Halide Frag Light - Cost, about $50 or less
Lighting is probably one of the more discussed and debated topics in reefkeeping. A solidly built light and/or fixture is well worth the money spent to get consistent light spread, spectrum and intensity. And most often, quality lighting and their respective bulbs are not entirely cheap. Rarely, it seems that one is able to DIY a light for small money, a small amount of technical know-how and a limited tool inventory. A great example is a DIY'd LED system. Impressive to look at, but the cost of materials and the know how to safely wire and power can be prohibitive, especially for myself. I was looking for a small but strong light for my small frag compartment. DIY's T5's were too big and too much money, 150w and 250w halides were just too much light andpower consumption, plus 50 to 60 dollar bulbs. Then I discovered the 70w converted halide frag lamp made from a $10 halogen outdoor floodlight. The halogen bulb fitting is the same DE style/size as a 150 w DE halide clip. Wiring was incredibly simple with a 20-30 dollar 70w electronic ballast (that was traded for an Acan frag), and I found a $11 20k bulb on EBay. Great color and awesome PAR. Best bet is looking for a light that has a piece of tempered glass as a splash shield. Best of all, it's portable when I have a small tank of frags to sell at a club meeting or event. The thread linked at the topic is one of the best DIY threads out there, very straight forward and kudos to the author.
#6 Wild Food - Cost, Possibly free
There's plenty of fish and coral food to chose from when buying. Looking at some ingredients, you'll find soy isolates, artificial color and a bunch of other things you typically do not find on the reef. And after reading a food that shall remain nameless, I promised I wouldn't feed that stuff to my tank.
My favorite is collecting wild shrimp eggs/roe. In Maine, we are lucky enough to have seafood almost everywhere, and almost everyone knows someone who fishes commercially or works with what's left of the fishing industry. And it was at a club meeting where fish and coral food was being prepared, I noticed about 30 pounds(!) of fresh shrimp brought to the meeting by a member. A friend pointed out the mound of shrimp eggs collected the night before and all I could say was, "How do I get in on that?!" Promptly, I was offered at least 5 pounds of shrimp to take home for egg harvesting, and then shrimp curry. Females carrying eggs, or "eggers", under the tail are easily pushed out with a finger to collect. In about a 45 minutes, I had enough shrimp eggs to last until next years shrimp season. My fish go totally nuts for them and my LPS and Zoanthids will greedily stuff food in their mouths when fed. Here's some how to video from later that night...
http://picasaweb.google.com/naturebatslast/20100127#5436853430459617042
http://picasaweb.google.com/natureba...34101953770114
http://picasaweb.google.com/natureba...35594502643170


