View RSS Feed

Grand Delusion

New 54 corner up and running but....

Rate this Entry
Hey guys, Its my 2nd blog ever in my life... and my introduction to Reef Addicts was my first. Still trying to figure out how to fix my pics on the album section. It says, something about too big of a file, but I cant figure out how to fix it, I have no pics loaded on it. Anyway on to my story... er... Blog.

So here go's...My house has a little nitch where a 54 corner round tank would fit perfectly, but having limited carpentry skills, and not a huge budget, I decided to give it a go.This had been a on going project for almost 6 weeks now. First I cut the wall up with a my trusty sawsall. Click image for larger version

Name:	P4031052.jpg
Views:	152
Size:	102.2 KB
ID:	1584 Then I wanted to make it accessible from the backside, my (former aquarium room), work out room. Click image for larger version

Name:	P4031053.jpg
Views:	151
Size:	68.6 KB
ID:	1585
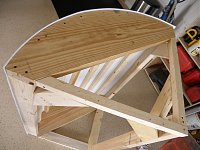
So the stand construction begins, because I simply could not find a easy way out. I have never built a stand before but I was going on basic skills and years of watching DIY's on forums. I spent too much time trying to figure out how I was going to get the curve to work right, and I came up with putting plenty of 2 x 2 's for support and to give the fibreglass sheet (someone help me with the name of the stuff). Its the stuff often used in bathrooms, it has a orange peel effect to sort of match my walls, but we decided to use 3 cans of the orange peel effect to closer match the walls.

Click image for larger version

Name:	P4031049.jpg
Views:	130
Size:	128.0 KB
ID:	1588Click image for larger version

Name:	P4031047.jpg
Views:	126
Size:	128.3 KB
ID:	1589 Click image for larger version

Name:	P4031050.jpg
Views:	138
Size:	100.3 KB
ID:	1586Click image for larger version

Name:	P5011201.jpg
Views:	119
Size:	90.1 KB
ID:	1591
Yesterday, got 15 pounds of some hi grade Bali live rock to get things roilClick image for larger version

Name:	54 tank 3.jpg
Views:	152
Size:	118.9 KB
ID:	1595Click image for larger version

Name:	54 tank 2.jpg
Views:	133
Size:	179.5 KB
ID:	1597Click image for larger version

Name:	54 tank 1.jpg
Views:	138
Size:	115.3 KB
ID:	1598
Click image for larger version

Name:	54 tank 5.jpg
Views:	142
Size:	82.5 KB
ID:	1596
OK, I will fast forward to what small problem I ran into, The sump area... I thought it would be cramped, but should be able to get by... after all the origional plan was to keep it simple make it a FOWLR, keep the wife happy, and life go's on Right? Wrong..Well yesterday, I get my new light a 250 watt Coralife pendant New from Ebay... Oh and I got it for $300. So I get the light installed, and then I hit the switch... WOW. This little fish tank is eventually going to be my SPS, and maybe a nice Blue Maxima, and maybe a few really nice Acans would be good . But I have this tiny little sump area that just will not work So I decided last night to go with something I could work with. Here is my problem.
Click image for larger version

Name:	54 corner sump.jpg
Views:	128
Size:	28.4 KB
ID:	1592
Here is my solution, use a 55 Gal. tank I have on hand and build a stand/ sump area, something I can work with, here is what i have come up with, and I could definately use your help and experiences with this. For years I have seen Melev's work, envious as hell too I might add, but I want something solid, and fuctional. Sump needs to include filter sock, skimmer, baffles, refugium, return section without the bubbles. I know I have seen the DIY's 100 times, but I would like to have something up and running by next week.
Here is what i have come up with. I would like to get some ideas from you pro's on what to do, you can be honest, I can take it.
Click image for larger version

Name:	sump-stand-new.jpg
Views:	138
Size:	99.7 KB
ID:	1594
Attached Thumbnails Attached Thumbnails Click image for larger version

Name:	P4031046.jpg‎
Views:	294
Size:	100.7 KB
ID:	1587   Click image for larger version

Name:	P4281195.JPG‎
Views:	284
Size:	27.9 KB
ID:	1590  
Attached Thumbnails Attached Images  

Submit "New 54 corner up and running but...." to Digg Submit "New 54 corner up and running but...." to del.icio.us Submit "New 54 corner up and running but...." to StumbleUpon Submit "New 54 corner up and running but...." to Google

Updated 05-01-2010 at 11:21 PM by melev

Categories
DIY projects

Comments

  1. marks69's Avatar
    i think you did a nice job. i wouldn't have used 2x2. i'm a carpenter and i know how bad the lumber is now a days. you could have wrapped the stand in 2 layers of 3/8 or 1/4 plywood first, that would carry alot of weight. other than that your good. i think the sump looks good, just make the ref on the side so the total flow doesn't go through it. or put it at the other end and feed it with a smaller amount of water.
    gl
    mark
  2. Grand Delusion's Avatar
    Thanks Maks69, I guess I should have explained the stand a little better, I used 2x4's mostly, and used 10 2x2's for the curved section. I didnt think I could make plywood curve enough to make it work. Although I thought about soaking it for a day. Just decided to take a easier approach. Oh, and the sump design... I agree. I dont know why I drew it up that way, thinking back to my 150 mix, I had the sump and refugium in 2 different tanks, refugium was about 18 inches higher, and I used a prefilter with the u tube, with flow from tank divided and restricted. Yeah I had problems with that over time. U tubes getting air. I will never use overflow boxes with u tubes again.
    Oh and looking back at what I wrote I sort of said something that didnt come out right about Melevs handy work, saying i wanted something solid and functional, what I probably should have said was I would like it solid and functional like what he does but just do it with a glass 55 tank and some cheap acrylic. I just want the sump to last without the seals giving away.
  3. upster's Avatar
    The placement of the tank and the stand is gorgeous. With the rounded front pane do you find that your view gets distorted? I remember seeing a post on reefcentral of a guy who built an 8ft tank that curved around the viewer. Sorry, but I can't seem to find the link. Your tank fits so perfectly in it's place.
  4. Grand Delusion's Avatar
    The front view is magnified by I guess 30%. Makes me want to stick my pecker in there. Just kidding... but honestly, when I was looking at a 92 gallon corner, I realized a 54 was the fit I needed for the spot. The corners were 28 inches, and the tank was 27.5 so I decided on the 54 instead of excessive carpentry needs.
    I am real proud of the final outcome of the tank, but I still need to tackle the ominous task of keeping this tank as clean as possible, capable of handeling sps and clams, with no additional rock in the main tank. Who is the expert on this subject?
  5. melev's Avatar
    I like the woodwork and the textured wallcovering solution. While it isn't strong (against an impact) it will definitely hold up well against drips over time. And it looks good.

    Rounded tanks are tough to photograph and equally tough to view livestock long term. The magnification and deflection can bother some people's eyes, including mine.

    To maintain the livestock you hope to keep, it'll be important to maintain water quality. If you don't want to add more LR, there are only a few options - the most obvious one would be regular water changes. Fresh carbon in a Phosban reactor (weekly) will help with clarity and absorb some stuff from the water.