View RSS Feed

Starting over with my tank!

My 75g RR Tank/Some Pics!

Rate this Entry
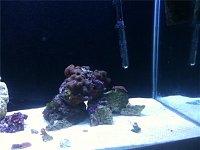
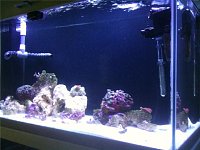
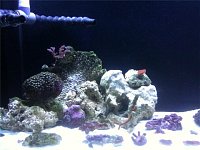
I installed my new T-5's yesterday and took some pics! I have 2 VHO's in the front and 2 T-5's in the rear. I now have to actually finish painting rear of doors and hang with new hardware, finish painting outside of hood, straighten out my electrical and put lights on timers, decide what to do about the sump and probably other things I can't think about..lol. FUN STUFF if ya an ADDICT!!

Well, here are some tank shots I took last night.

Click image for larger version

Name:	NL1.jpg
Views:	132
Size:	28.9 KB
ID:	2138 Click image for larger version

Name:	NL3.jpg
Views:	124
Size:	37.2 KB
ID:	2135 Click image for larger version

Name:	NL4.jpg
Views:	121
Size:	35.9 KB
ID:	2136Click image for larger version

Name:	NL2.jpg
Views:	109
Size:	39.5 KB
ID:	2137 Click image for larger version

Name:	NL5.jpg
Views:	111
Size:	36.6 KB
ID:	2134

Submit "My 75g RR Tank/Some Pics!" to Digg Submit "My 75g RR Tank/Some Pics!" to del.icio.us Submit "My 75g RR Tank/Some Pics!" to StumbleUpon Submit "My 75g RR Tank/Some Pics!" to Google

Updated 07-02-2010 at 09:34 AM by Hat39406

Categories
Lighting , ‎ My tank! , ‎ DIY projects

Comments

  1. melev's Avatar
    Wow, look at all that space, and that nice clean tank!

    Your locline return is submerged a lot. Did you drill anti-siphon holes yet? Be sure to drill one or two in that white section 1/2" beneath the normal water's surface.

    I have a suggestion for you. Make an identical section as the one you have now, and spray paint it black with Krylon Fusion spray paint. Let it cure for a day or two, then swap it out with the current one. It'll be less obvious. Additionally, that locline doesn't have to be that long unless you feel it needs to be for some reason. You can remove some of those sections and still point them where you want the flow.
  2. Hat39406's Avatar
    Thank ya Marc, yeah in another post I made you told me about drilling 2 1/8th" holes 1/2", that's what I did. I tested it about 3 times too! By unplugging the pump, worked great not even close to the top of the sump.

    I was going to ask that question next Marc, lol about painting the PVC. I've seen it done but didn't know what paint would be safe. Can I get that paint at Lowes? And yes, do yo think I should shorten the return pipe (locline) or shorten it and bring it to the top middle of the tank? What would you do?
  3. melev's Avatar
    I wouldn't run it that low in my tank at all. It isn't that it is wrong, it's just an enormous eye sore. If I could have magic flow without anything visible, I'd do it. I was joking about getting the motor side of the vortech in clear acrylic or glass. hehe

    Krylon Fusion is available at Walmart for sure. Home Depot or Lowes may have it. You don't have to prep the material with anything, but it should be clean. If you use the stuff that was in the tank, rinse it well and dry it completely. Then spray the paint with a few coats, and let it cure for 48 hours. I rushed it once and the water got notably gray. It cleared away, but if you can cure it for a day or two, you won't see that at all.

    Locline is adjustable, so you can orient it to where only the tips and a few lobes are all you see in the tank. Your PVC is also a choice, so you can place it where you feel it does the most for the tank to generate random flow.
  4. Hat39406's Avatar
    Thanks Marc, I'll try to make it as high as posible. (piping) And once I c
    redo my sump or figure how I'm going to use it my heater will go in their.
  5. melev's Avatar
    That would be good. You just have to remember that if you end up in an emergency with a broken return pump or sump, move the heater back up to the display tank. It's one of those things you don't remember until you live through it, but it doesn't hurt to remind yourself of that little possibility from time to time. Preparation is key.
  6. Hat39406's Avatar
    Yeah it sure is! I think for my sump I will replace the bioballs with rubble ruck and macro algae. It's the simplest thing to do for now. My sump has some slot for three dividers for media but the are missing. I just drop carbon and zeolite down in the sump and the water flow has to pass through it. I also put some filter material next to that. Tank is super clean and corals are happy, good enough!
  7. yiyi67's Avatar
    Thats excellent advice on the heater melev. I nuked a nano by not doing just what you described. My return pump fried and searching for the correct part to fix took me a few days, during which my temp plummeted and killed about 20 ricordea, but my sump was nice and toasty! A costly mistake that only needs to happen once to be remembered.
  8. Hat39406's Avatar
    Wow, that is terrible yiyi! But yeah great advice indeed Marc.
  9. Midnight's Avatar
    Hey hat glad to see progress on the new tank I have even seen people hide a small heater in the water behind the front lip/ hood of the waquarium and set it to like 74-75 degrees just as a failsafe.
  10. Hat39406's Avatar
    Thank ya Midnight, I'll have to see about that info on the heater. The only drawback I see with that is when power goes off or I turn return pump off for a feeding or maintenance, air will probably hit the heater and crack it.