View RSS Feed

melev

The 280g reef is leaking

Rating: 7 votes, 4.57 average.
The top left corner of my tank is leaking. Ugh. I'm going to have to figure out what I can do about it today. The carpet is wet in the entry way.

Update 7:57 pm 7/03/10:


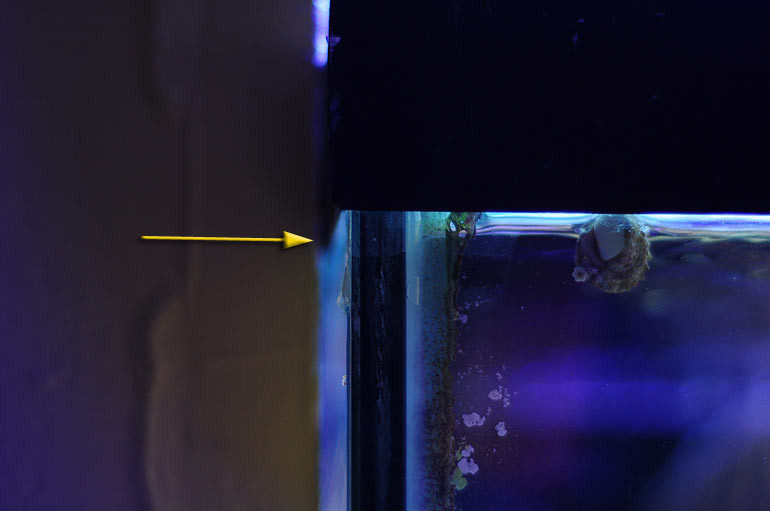
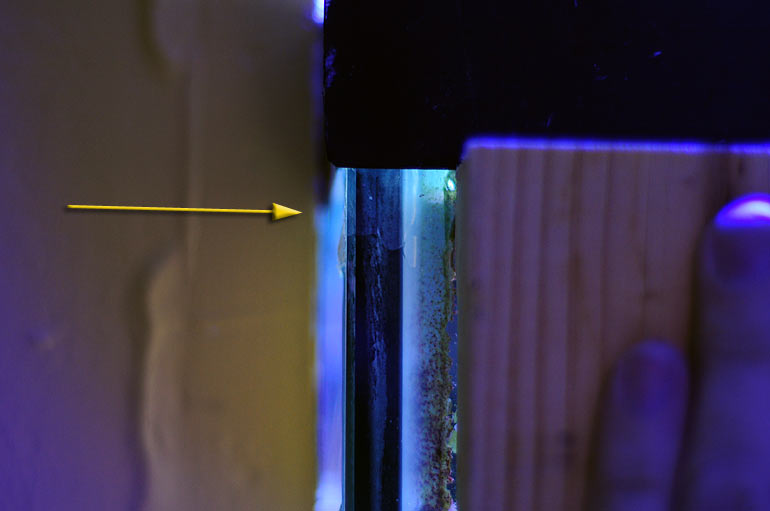
Here are the pictures I took this afternoon. I didn't take a picture of wet carpet because you know what that looks and smells like. I removed the wooden column on the left side of my tank as soon as I saw how it was soaked with saltwater. I also checked tank salinity, and it has dropped to 1.024sg. I'm making RO/DI water now, and will probably keep it going all night.

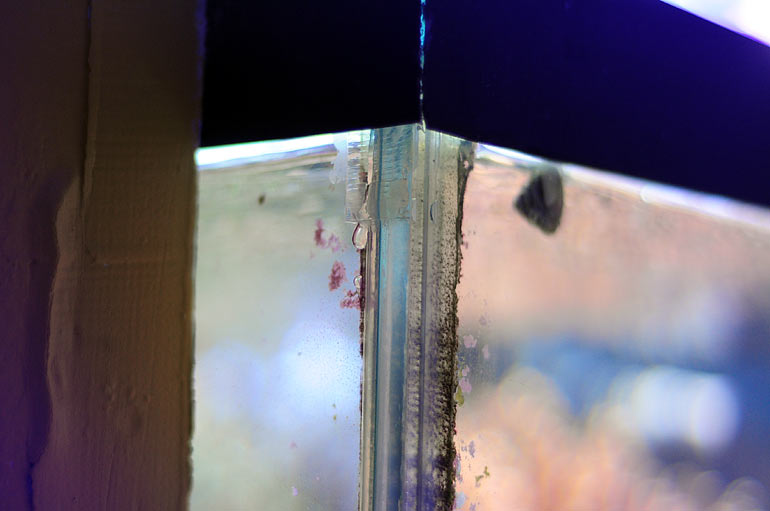
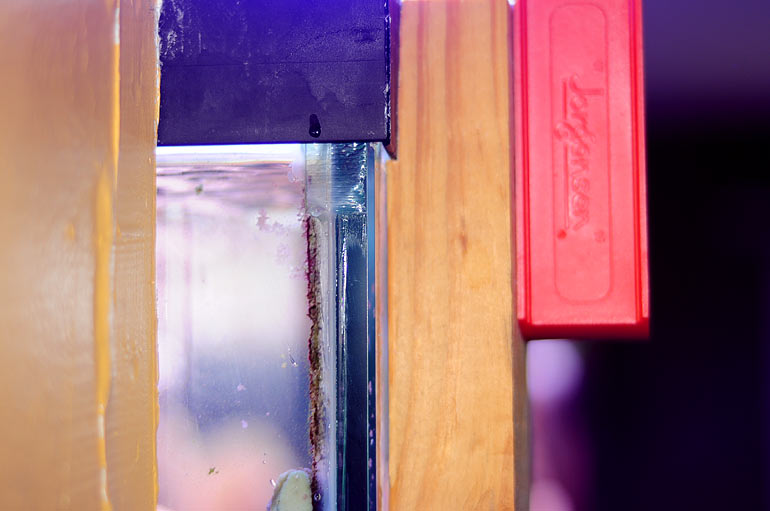
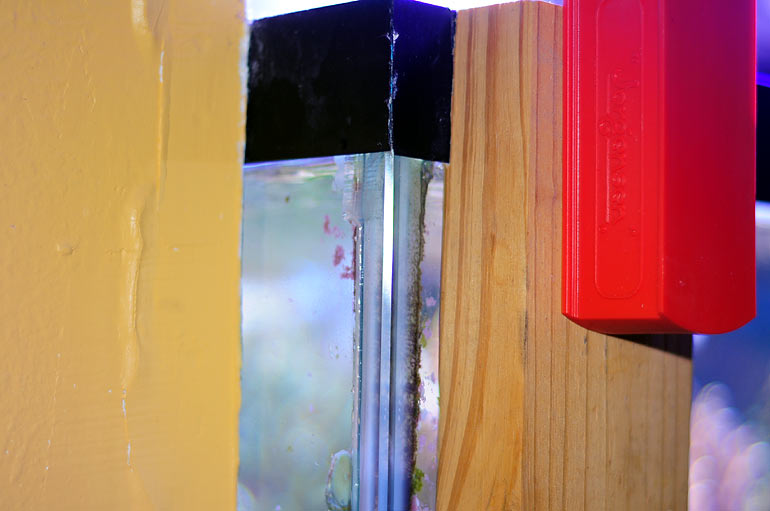
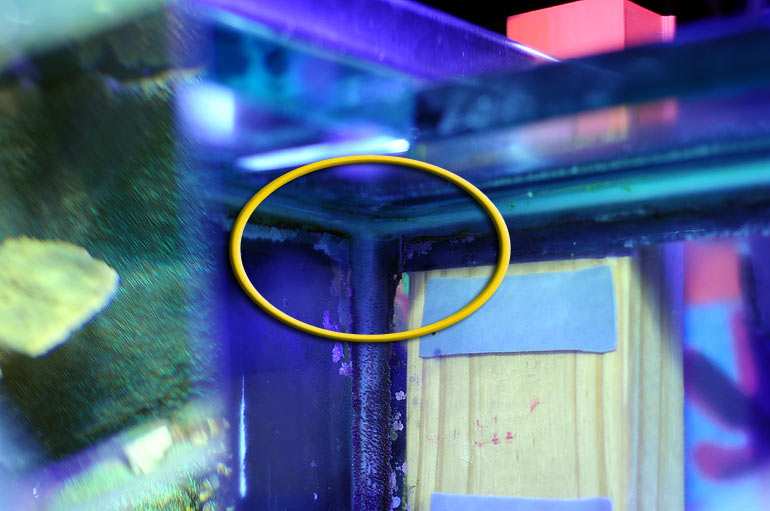
Here's the leak. Doesn't look like much until you realize it drips non-stop.


Note the hollow spot pointed out where the silicone is no longer making contact, below the water line.


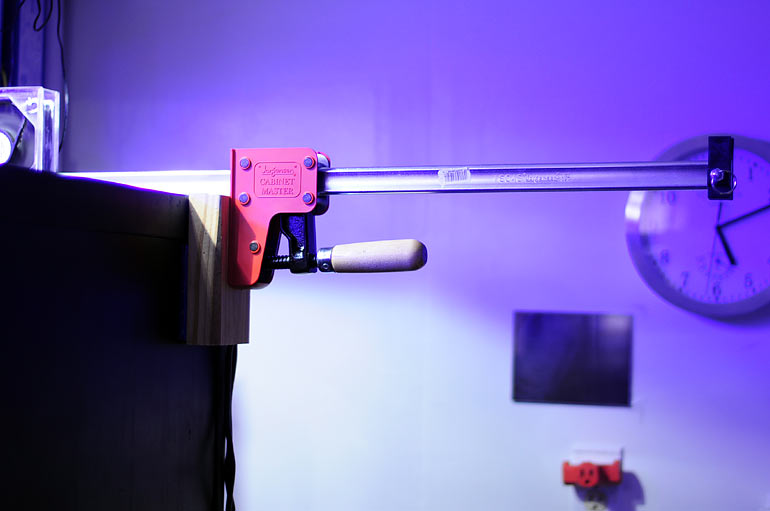
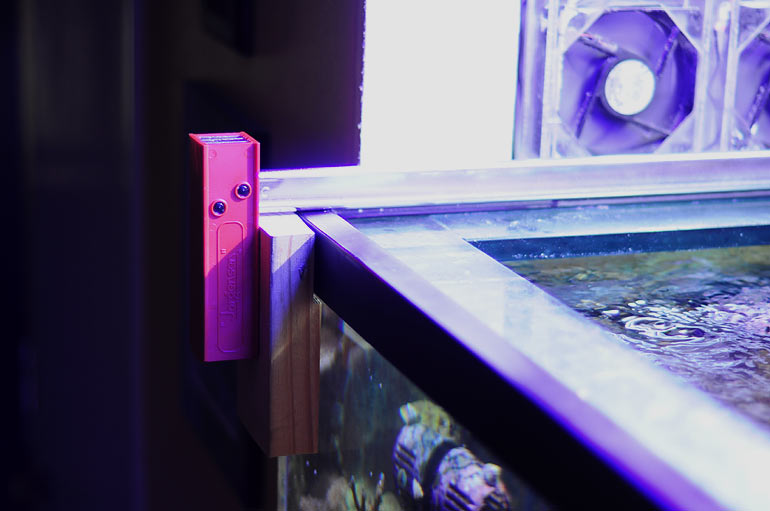
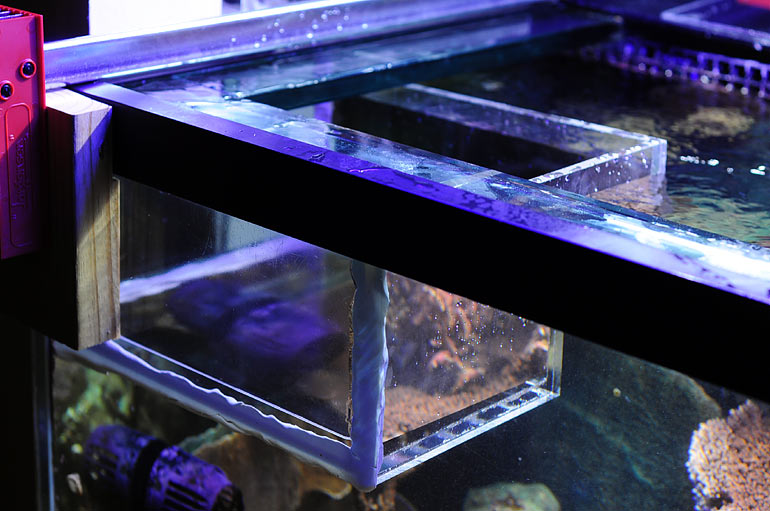
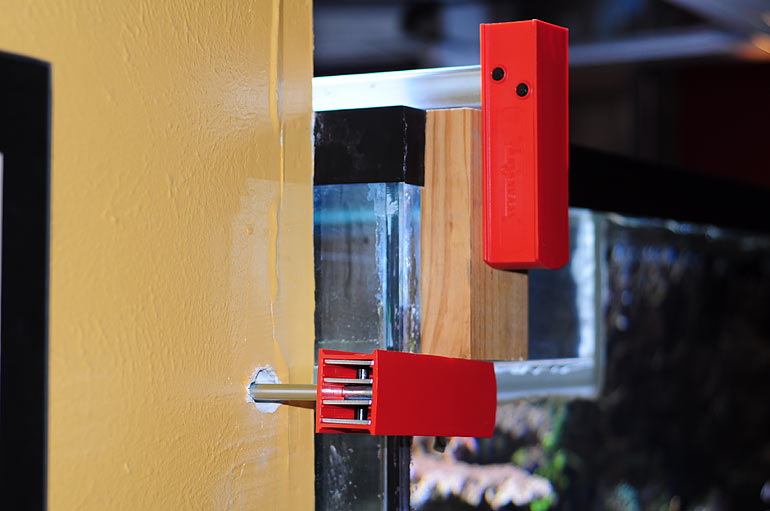
At Home Depot, I found these huge 48" clamps for $40 each. I bought two, but only have one in place at the moment.


A wooden block front and back helped disperse the pressure a bit. I had to improvise because of the plastic trim. For the back piece, I used a piece of acrylic behind the block to help even out the pressure.


For the front, I ran a block through my table saw to create a small offset.


As soon as it was clamped, I slowed the leak down. A couple of ml have drained so far.

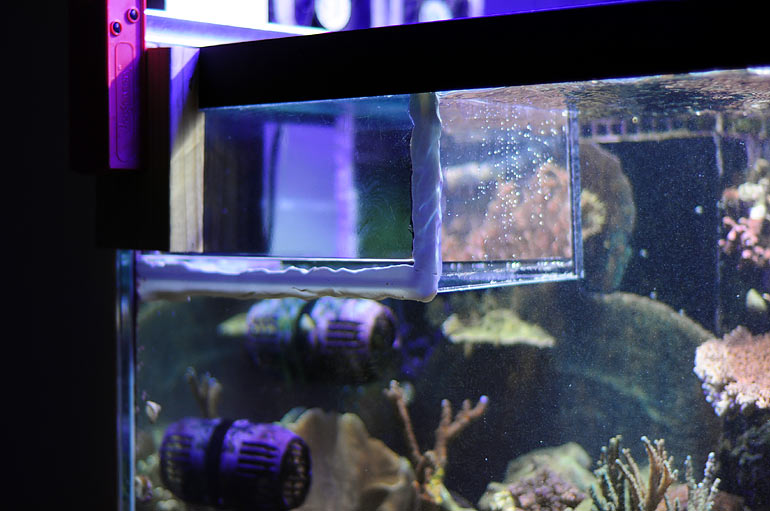
While that was holding, I grabbed some 3/8" acrylic and created a internal overflow, so to speak. Using common Plumber's Putty, I rolled it out 1/4" thick and created strips to affix to the edges that would press against the glass. Not may favorite choice, but I had to do something. My skimmer hasn't gone nuts yet.

The water pressure holds the box in place, once I scooped & siphoned out the water in the box to create that dry void.


Had to rescue this lost snail.


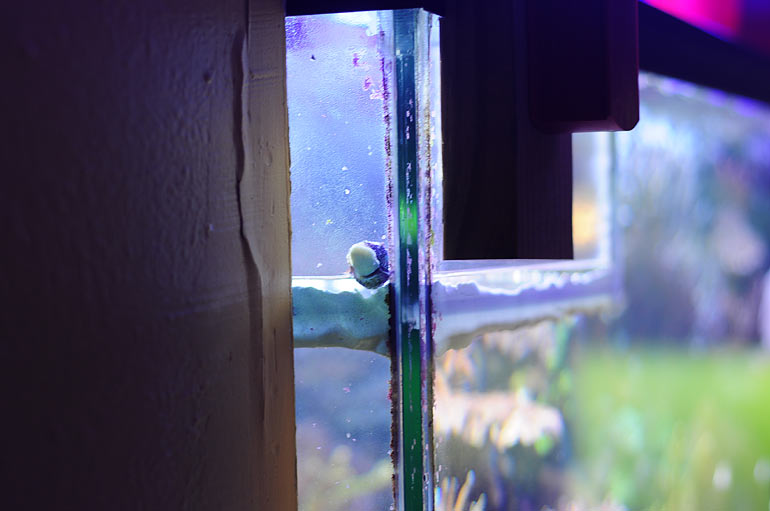
I had some acrylic mirror material to see what is going on in the corner now that the water was out of my way.


For now, I'm planning to cut out the current silicone in that corner and reapply new silicone to the area. It's a patch, and essentially hold things together and keep the water in my tank for the time being. I hope the putty doesn't hurt the livestock (it isn't melting), and the box doesn't drop away all of a sudden.


UPDATE 12:39 am 7/04/10:

The mending job is not going to help save the tank. The seam continues to fail, which was visibly altering as I worked the silicone in the dry box above. It was frightening, actually. I drilled a hole through the wall for a second clamp to be implemented.


The towels did a good job sopping up the water from the leak earlier today, but I'm not doing anything else with the chance that it is going to blow out soon.


Submit "The 280g reef is leaking" to Digg Submit "The 280g reef is leaking" to del.icio.us Submit "The 280g reef is leaking" to StumbleUpon Submit "The 280g reef is leaking" to Google

Updated 07-04-2010 at 12:41 AM by melev

Categories
NEED HELP STAT!

Comments

Page 3 of 4 FirstFirst 1234 LastLast
  1. maroun.c's Avatar
    Not a silly question at all.
    I remember discussing it with an engineer (with some subspecialty in glass structure...) a few weeks back. He said that silicone is not good for continuous strain. It is very good at sealing but long term with non stop pressure will eventually degrade it. He was suggesting some external metal bracing for my new tank and silicon only to seal the seams that are held by metal bracing.... to add to that most of our tanks were built before those new wavemakers hit the markets and if you read the note on Vortech packaging (same for Tunze or others I would assume) it mentions not using it for tanks not made to tolerate vibrations caused by the wave.... for sure its just a disclaimer to avoid being blamed/Sued however I do believe that the excessive vibrations of a wave making system will eventually cause many tanks to loose a seam...
    Maybe it would be worth it to decrease flow a bit to decrease the vibrations which willl act on the silicon like a hammer.
    Lowering the water level if you can do it without exposing corals would be a great. Not sure I'll sleep peacefully seeing it drip and have airbubbles in the seams so I really hope it holds.
    My old 80 G did show air and water bubbles in the seams and when pressing on the glass I could see them move inside the silicon and it held for 4-5 weeks. is the glass only 1/2 inch on this tank? And yes we all hate to see this tank being broken down.
  2. Wes's Avatar
    four sixty! 460! four sixty! 460!

  3. melev's Avatar
    So exhausted. The tank is essentially empty of all livestock. I'll pick through the substrate tomorrow to see if any more hermits or snails appear.

    All the livestock has been transferred to holding vessels plumbed into the sump, with the filtration (skimmer, refugium, carbon, calcium reactor, vodka dosing, ATO, heaters....).

    It was sad, somewhat amazing, and there were times we were laughing so hard we had tears in our eyes. My carpet is soaked, the scale is broken (we tried to weigh the Toadstool leather), and my AT&T Uverse's tv receiver died thanks to Drew. LOL

    Tomorrow I'll get the Vortechs on the SPS vat and get the lights up over those two bins. A lot of pictures were taken, and Wes used his iPhone 4 to record two hours of video. Who knows if any of that is usable.

    Need to sleep, then deal with the aftermath tomorrow.
  4. NightShade's Avatar
    WOW, glad you got stuff transferred over. I know that at least takes a lot of stress off, don't have to worry about the tank blowing out and being a total loss.

    At least you guys all got to have a little fun doing things though, it can be sad tearing something apart that you have worked so hard to make nice. Your tank was and has been "gorgeous" as my wife says. Would have loved to seen it in person before this happened. Anyway sounds like Wes has an idea of what will be happening next. . . 460 in the works?????? Hmmmmm sounds like a little challenge and change of design but really interesting at the same time.

    Carpet will dry eventually and I am sure you have something in your arsenal to get it clean again, the scale can be replaced though did you even get a little reading on weight? And your Uverse receiver got messed up. . . aw Man no cartoons tomorrow, LOL.

    Sleep well, I can bet a lot of others will as well knowing things are looking better.
  5. Snakebyt's Avatar
    glad to hear you are steaming thru this ordeal, and being in a good mood about it all. Im sure there will be lots to see in the next few days, and im sure we will be able to hear all about it in next months podast.

    Keep your chin up
  6. UkSweeney's Avatar
    not good!!! i see you have already drilled a hole through the wall, why not keep going and add a longger tank. Even if it is only an extra inch or 2.
  7. agsansoo's Avatar
    This is a sad day indeed. I've seen this sort of repair at a LFS here in SoCal. It was a 300 gallon Lee-Mar tank that started leaking after some kids were hanging from the rim of the tank to get a better look. Lee-Mar came out the next day and added more euro bracing to the whole top of the tank. Fixed the leak. Just a thought.
  8. maroun.c's Avatar
    Glad you got it all emptied.
    +1 on how sad it is to empty your tank
  9. Hat39406's Avatar
    Very sad time for sure! I could hardly sleep the night it happened, just wanted fly north two hours with my blind mans cane and help. ;-p. Marc, your new tank will be awesome though! As a regular for the past few months I feel like the sites main inspiration passed away. Marc, did you get frags off the corals that was growing on the glass?
  10. Hop's Avatar
    Well hopefully the hardest part is over. I always enjoy setting them up over tearing them down. Just think; on the next one you can make subtle adjustments that you maybe had in the back of your mind...
  11. smoothie's Avatar
    I just heard about this. Sorry to hear man. Even though it is a forced possible upgrade it's still going to be nice and anything you would have done differently now is the time. If you need anything let us know. We're here for ya
  12. melev's Avatar
    I'm going to have to start a new entry soon with all the latest.

    Today, I got all the live rock out of the plastic pond liner and into a barrel of tank water. I added the Cskim-1200 skimmer to work on the rock, but so far it isn't doing much. Hmmm. The pond thing was removed since the carpet under it was soaked. I also got the lighting rack suspended over the vats, and when I get up, I'll figure out where to put the ballasts so the cords can reach the pendants.

    Humidity in my house is 67%, but I just adjusted the A/C to get that down. We are expecting thunderstorms Tuesday and Wednesday, which will also be a factor. Plus my wet carpet - I hate to bother with it since I'm just going to mess it up further as I remove all the sand and possibly the aquarium. Because of the front seam, I have a feeling I have to take the tank out in pieces as I don't know if it could be moved out in its weakened state.
  13. NightShade's Avatar
    Well things at least coming along. I don't know what you may want to do with the carpet. I would suggest pulling it up and taking it outside to dry/be cleaned but since it is going to rain I don't think that would do much good. A couple days of dry weather would do some good. Then again now that I think of it we had a leak in the basement of the building and had some majorly wet carpet and pulled out a carpet shampooer to suck up the excess water which really did help. The one we used wasn't great but renting a rug doctor getting the salt water cleaned up and then actually cleaning it may not be a bad thing and would hopefully be drier than it is now. But it probably would be better to wait until after you get things figured out with the tank.

    I don't know what would be easier to do with the tank. . . if you are going to break it down anyway I would go for that. If you don't really want to mess with it a ratchetting strap around the top and then one ran underneath on each end and wrapped over the top should reinforce it enough to get it moved out of the opening. Then I would get two movers dollies and a piece of plywood about the same size as the tank and attach it to the movers dollies and then you can roll it most anywhere you want.
  14. melev's Avatar
    Interesting. I hadn't thought about straps. With the pink foam underneath, I suppose it would be possible to work some under to help hold it together. The LFS has suction cups I can borrow for a day, and I'd need some worker bees to help get it out of the hole. I think we would take it out to the back porch if we could pull it out in one piece.

    I started a new blog entry to discuss what could come next. Some of you may have bookmarked this entry to keep up with the latest. What you should do is "Subscribe to this blog" (at the top of the page under the profile picture), and then select "via email notification". That way each time I create a new entry you'll be notified.

    I know I haven't been thanking all of you individually, but I do want you to know that it did not go by unread or ignored. I appreciated each and every person's comments and it helped keep my spirits up. Thank you for support, ideas and suggestions. Your input is valued, and there are times when others make excellent suggestions that I'll immediately incorporate, adjusting my plans accordingly for a better outcome.

    So here's the idea entry: http://www.reefaddicts.com/entry.php...eaming-a-dream
  15. dread240's Avatar
    I have no doubt in my mind that regardless which tank setup you choose to go with it will become an amazing creation in short time. Though if this keeps up you're going to end up with like a 10,000 gallon built in your back yard one day like that Arabian tank lol
  16. ryancmatchett's Avatar
    All the best wishes for you. We will be following along....could there be an expanded topic about what to do in an emergency in the future....??. It also sounds like so many people are there to help out....Good luck, and will be watching to see what you do next.
  17. melev's Avatar
    Thanks. Even now, it is a delicate balance to keep the livestock healthy since there is no sand and no rock in the system to buffer the water. Alkalinity was up to 15 dKH today, so the calcium reactor has been taken offline. I didn't get a chance to run all my tests yet, but will today.
  18. UkSweeney's Avatar
    look on the bright side, this is an test of your website. Our support group, our place to share knowagle.
  19. drimo's Avatar
    Marc, what a bummer! But you've already got a plan in progress and you're a lot more prepared than most of us would ever be. You are a great resource to the hobby, so please continue to show everyone your new plan, which is here if anyone hasn't seen it.
  20. melev's Avatar
    I'm going to be editing the pictures so you guys can see some of the breakdown and the current set up soon. Hopefully by Sunday.
Page 3 of 4 FirstFirst 1234 LastLast