Sam11909
Step-by-step Instructions for DIY LED's

by
, 11-02-2010 at 08:11 PM (5998 Views)
I have noticed that there are not many places where you can find information on DIY LED's for beginners, and I haven't seen any blogs on Reef Addicts yet, so I thought I'd post my experience. I am not an expert by any means, I am just a beginner myself. This blog will only include what I have learned from others and what I've learned from my own mistakes. If there is any information that is incorrect or not complete please comment and add it to this info.
Parts List with Prices:
- Heatsink USA 4x4" heatsink - $17.48 (with cut fee and shipping) http://heatsinkusa.com/storename/heatsinkusa/dept/269591/ItemDetail-10607169.aspx
- 24v 6.5A Potrans power supply from MPJA - $25.02 (with shipping) http://www.mpja.com/prodinfo.asp?number=16854+PS
- 3 1000mA Buckpucks with potentiometers from LED Supply - $64.96 (with shipping) http://ledsupply.com/03023-d-e-1000p.php
- 2 Cree neutral white XR-E LED's from LED Supply - $14.98 http://ledsupply.com/creexre-nw.php
- 1 K2 cyan LED from LED Supply - $6.97 http://ledsupply.com/05027-pe12.php
- 4 Cree XR-E royal blue LED's from Nanotuners - $32.98 (with shipping) http://www.nanotuners.com/product_info.php?cPath=74&products_id=622
- 2 Cree XP-G cool white LED's from Nanotuners - $13.98 http://www.nanotuners.com/product_info.php?products_id=672
- 7 Cree XR-E 40 degree optics from Nanotuners - $6.23 http://www.nanotuners.com/product_info.php?cPath=74&products_id=626
- 2 Cree XP-G 40 degree optics from Nanotuners - $3.18 http://www.nanotuners.com/product_info.php?cPath=74&products_id=680
- 10 thermal pads from Nanotuners - $3.90 http://www.nanotuners.com/product_info.php?cPath=74&products_id=627
- Aluminum rod from Lowe's - $5
- 25ft 22 gauge stranded copper wire from RadioShak - $5
- 60/40 rosin-core solder from RadioShack - $4
- Craftsman 45w 950* heavy-duty soldering iron (I already own this)
- Power cord for LED power supply (just a normal heavy-duty power cord)
- Fan (from an old computer)
- 12V 1.3A fan power supply (game system power supply)
- Super Glue Gel for attaching LED optics (not recommended, but it was all I had at the moment)
- 7 function multimeter to test LED's mA from Harbor Freight (free with coupon)
Total = $203.68
Why LED's?:
The 3 main choices for lighting our reef tanks are usually MH, t5, and LED. So which one should we choose? It all depends on what kind of reef tank we are looking to set up and a little on what we prefer color wise. The benefits of having LED's is how long they last, their high intensity of light, their low power consumption, their color controllability, and how little heat they put in our tanks. LED's are rated to live for 13 years (at 10 hours a day) before losing intensity. This is a big advantage over other light choices where you need to change the bulbs once or twice a year. These lights are also very high intensity, able to put out a whole lot of PAR at very low electrical consumption giving us the perfect combination. So even though it might be a bit expensive at first, it pays off in the end. Color controllability is one of the main reasons I chose LED's over other lighting. If you have LED drivers with potentiometers you can pretty much get any color you ever wanted. You can change your color combination when ever you want letting you get the perfect color and pop from your coral. Other lighting, like MH, usually needs to be supplemented with other lights, such as t5, but with LED's you get to choose what color temp you want without having to add to your electric bill. Another reason that people choose LED's is that they do not give off any infrared light (heat in light form). The LED's themselves are very hot and need to be cooled, but the light that goes into your tank does not carry any heat therefore not adding to the heat in your tank. This can save a lot of money when you are debating wether or not to buy a chiller to keep things cool. LED's, in my opinion, are the future of reef tank lighting.
Choosing LED's:
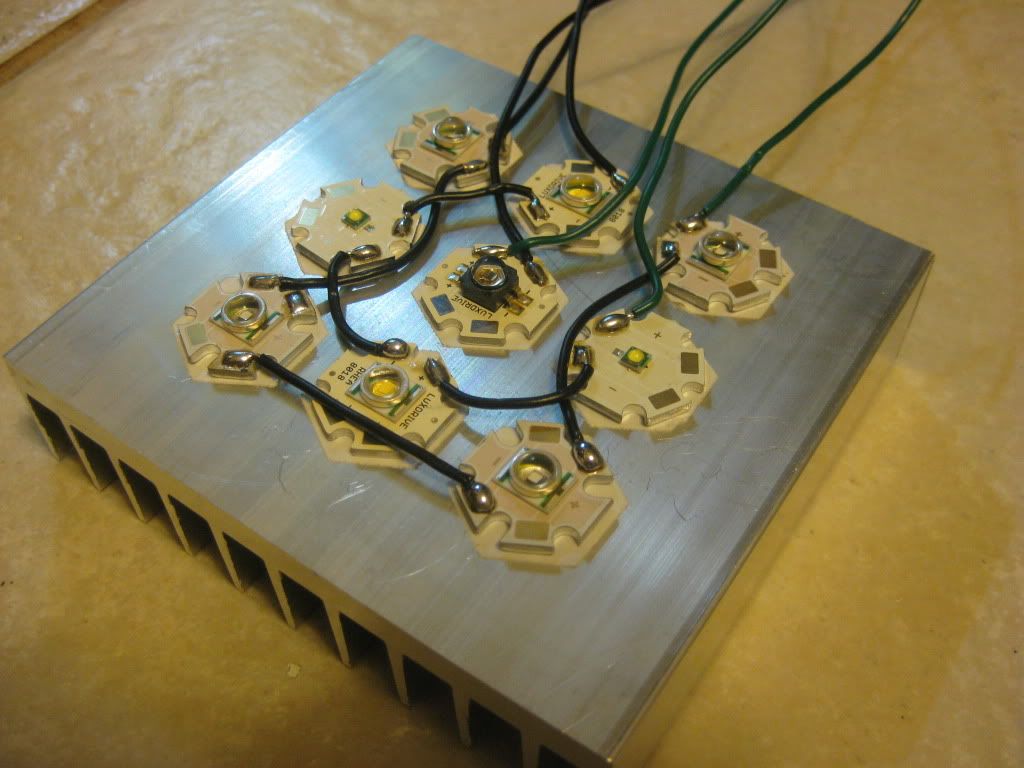
I can only speak for CREE because they are the only LED's I've tried, but there are other companies that sell high light LED's that you might want to check out. When using CREE LED's we like to use XR-E and XP-G because they are the brightest and most widely available LED that CREE puts out. XP-G are brighter than XR-E but XP-G only comes in 2 colors, royal blue and cool white. Royal blue and cool white is the traditional combination of LED colors for our tanks but blue, neutral white, red, and cyan are also being added into the mix. With the original 1:1 RB (royal blue) to CW (cool white) ratio there seems to be colors missing that are present in other lighting. Because LED's tend to only put out one small part of the spectrum, it seems we need to add other colors in to balance it out a little more. The color combination that I finally decided on was 4RB:2CW:2NW:1cyan. Keep in mind that adding NW makes you need more RB to balance it out. Now that mine is setup I keep it at 50%RB:25%CW+NW:50%cyan to get the balance right. Usually you would want 4 RB for every 1CW and 1NW if you want a more blue look. If you want to learn more about LED color combinations you can check out this link, there is tons of info on this thread about which color combination is the best.
http://www.nano-reef.com/forums/inde...ic=246394&st=0
Wiring:
Out of all the different parts of DIY LED's this is the subject that took me the longest to understand. I had no idea how to do the wiring for my LED's, so I did a lot of research and asking around. This is how I wired my LED's : wall plug > heavy duty extension cord > power supply (converts AC to DC) > LED drivers > LED's. Here's a diagram
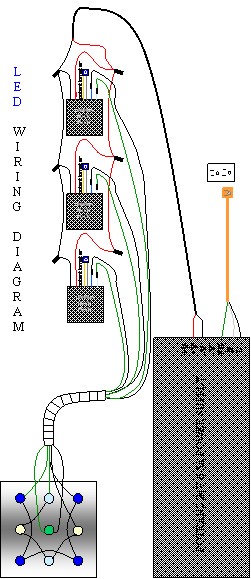
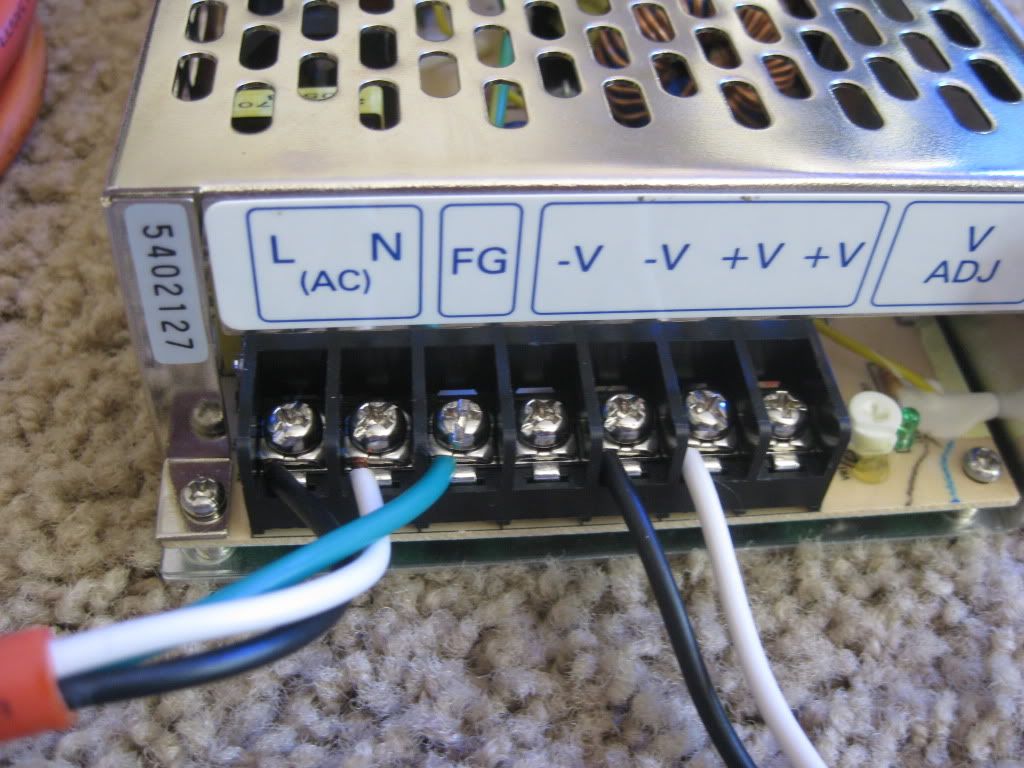
Buckpucks are wired in parallel from the power supply
The 3 wires that are on the left side are from an extension cord that I found. Black > L, white > N, and green > FG. The wires on the right go to 3 1000mA Buckpucks. With my setup the black wire is -V while the white is +V. -V attaches to - and +V to + on the Buckpucks. These are then wired in a series as you can see in the diagram above. The - on the Buckpuck attaches to the - pad on the LED then goes through up to six LED's (with Buckpucks) and back to the + wire on the Buckpuck. All joints were soldered and then wrapped with electrical tape.
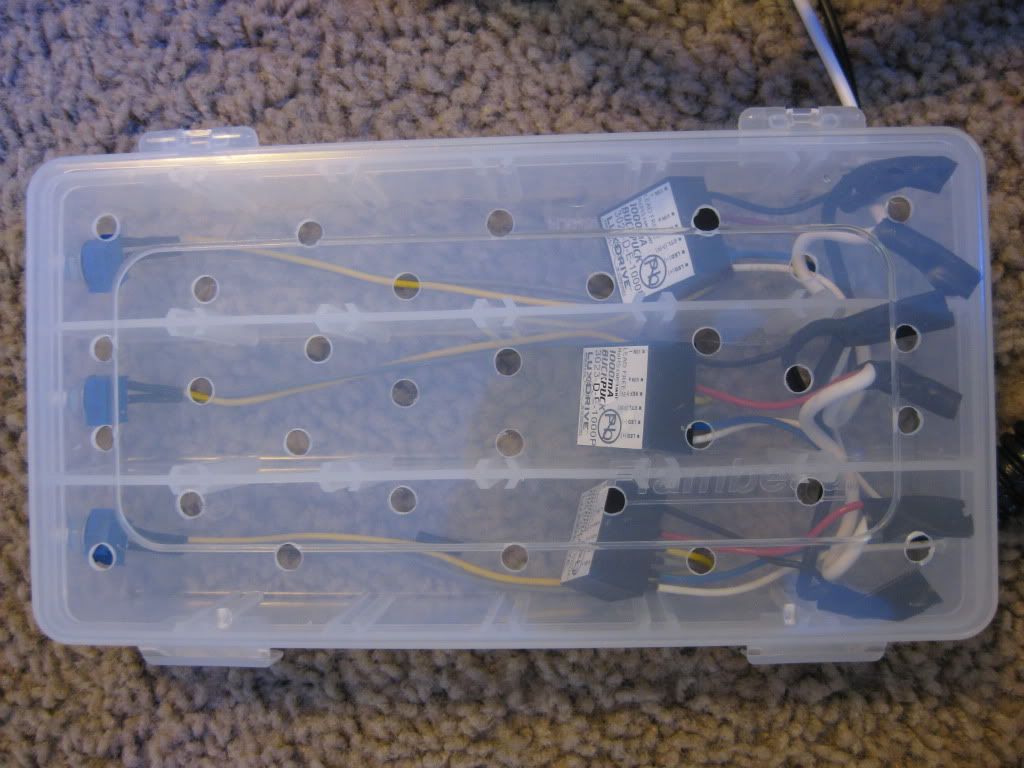
I used an old tackle box to condense all of the Buckpuck wiring. As you can see I also drilled holes for ventilation and dimmer knobs. The Buckpucks get VERY hot.
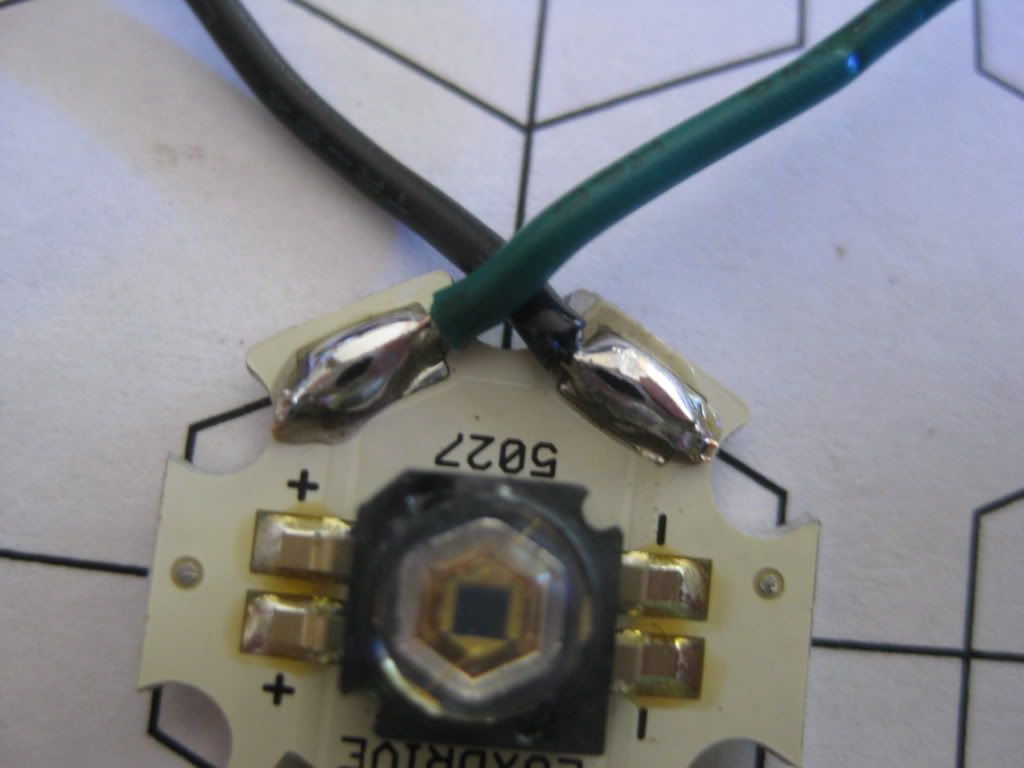
Soldering:
I did my soldering with a 950* Craftsman heavy-duty iron and 60/40 rosin core solder. It is recommended to have an iron that is at least 400* or more when working with 60/40 solder. 40/60 and 60/40 are totally different solders. 40/60 takes a lot more heat to get it to the soldering temp. 60/40 is the best solder for LED's because you do not need to heat the LED much to make a solder joint. With my iron it took very little time before I could make the joint. I also did my soldering before I attached them to the heatsink. If you attach them to the heatsink and then try to solder, the heatsink will do it's job and pull the heat away making it harder to melt the solder. Here's a thread with more tips on soldering LED's.
http://reefcentral.com/forums/showthread.php?t=1908547
Here's my first solder joints. Not too bad for a beginner
After soldering I attached them with Nanotuner's thermal pads. I highly recommend them, much easier than drilling holes and and adding screws.
(continued)