View RSS Feed

pepper'scove

Acrylic welding - Overflow installation!!

Rating: 18 votes, 5.00 average.
Just made my first ever acrylic weld... other than my practice joints. I'll be posting some pictures later this evening. I'll also be posting an updated picture of my tank and the new (mostly completed) plumbing. It's been a long time coming, but by the end of the weekend I will probably be able to give my system a full scale water test (and hopefully share a video with you guys). Hope you all enjoy the pictures when I get a minute to post them this evening!

Okay, so as promised, here are my photos:

I'll start off with the two pieces of acrylic I had routed out by my uncle. He owns a sign shop and has a massive CNC router and got these pieces shipped to me and at my door in less than a week from the time I sent the original files to him! They're both black 1/8" thick acrylic

Click image for larger version

Name:	IMG_1300.jpg
Views:	179
Size:	148.4 KB
ID:	7062Click image for larger version

Name:	IMG_1301.jpg
Views:	187
Size:	138.7 KB
ID:	7063

Next come pictures of some of my materials and tools. The WELD ON 4 is what I used as a way to "weld" or chemically join my two pieces of acrylic. The acrylic cleaner seemed like a good idea at the time, but now I am wondering if it may have left a residue that will cause the joint to prematurely fail sooner than it otherwise would have. However, since the acrylic is backed by 1/4" glass I doubt it will be an issue.
Click image for larger version

Name:	IMG_1308.jpg
Views:	156
Size:	117.0 KB
ID:	7068Click image for larger version

Name:	IMG_1310.jpg
Views:	173
Size:	102.9 KB
ID:	7070Click image for larger version

Name:	IMG_1309.jpg
Views:	173
Size:	109.8 KB
ID:	7069

Here we have a few pictures of the acrylic pieces after they were welded together (I didn't get any pictures of it in process because it was all new to me and I didn't want to mess anything up)
Click image for larger version

Name:	IMG_1304.jpg
Views:	174
Size:	110.6 KB
ID:	7064Click image for larger version

Name:	IMG_1305.jpg
Views:	171
Size:	107.4 KB
ID:	7065Click image for larger version

Name:	IMG_1306.jpg
Views:	166
Size:	111.9 KB
ID:	7066Click image for larger version

Name:	IMG_1307.jpg
Views:	177
Size:	124.4 KB
ID:	7067

Here are a few pictures of the overflow before the acrylic facer was added.
Click image for larger version

Name:	IMG_1311.jpg
Views:	192
Size:	110.1 KB
ID:	7071Click image for larger version

Name:	IMG_1312.jpg
Views:	228
Size:	115.0 KB
ID:	7072

And a picture of the corner overflow all taped off for silicone application.
Click image for larger version

Name:	IMG_1313.jpg
Views:	171
Size:	101.9 KB
ID:	7073

Now the overflow is "glued" to the glass portion of the overflow by silicone deposited between the two surfaces.
Click image for larger version

Name:	IMG_1314.jpg
Views:	168
Size:	88.3 KB
ID:	7074Click image for larger version

Name:	IMG_1315.jpg
Views:	180
Size:	104.0 KB
ID:	7075Click image for larger version

Name:	IMG_1316.jpg
Views:	161
Size:	106.2 KB
ID:	7076Click image for larger version

Name:	IMG_1317.jpg
Views:	179
Size:	121.5 KB
ID:	7077

A picture of the overflow facing and the tank bottom and walls all taped off for silicone application
Click image for larger version

Name:	IMG_1318.jpg
Views:	162
Size:	125.0 KB
ID:	7078

The "finished" product after the masking and masking tape have been removed.
Click image for larger version

Name:	IMG_1319.jpg
Views:	168
Size:	129.7 KB
ID:	7079Click image for larger version

Name:	IMG_1320.jpg
Views:	178
Size:	108.6 KB
ID:	7080Click image for larger version

Name:	IMG_1321.jpg
Views:	159
Size:	124.3 KB
ID:	7081Click image for larger version

Name:	IMG_1322.jpg
Views:	171
Size:	123.7 KB
ID:	7082

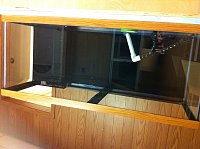
Side view of the tank with the overflow pipes visible. In the not-so-distant future I will be painting this surface so that people can't look into the overflow on the side.
Click image for larger version

Name:	IMG_1323.jpg
Views:	206
Size:	124.4 KB
ID:	7083

An internal view of the overflow box
Click image for larger version

Name:	IMG_1324.jpg
Views:	200
Size:	113.2 KB
ID:	7084

A full tank shot, minus any of the modular loc-line hose shown in the photo.
Click image for larger version

Name:	IMG_1325.jpg
Views:	190
Size:	120.0 KB
ID:	7085

Submit "Acrylic welding - Overflow installation!!" to Digg Submit "Acrylic welding - Overflow installation!!" to del.icio.us Submit "Acrylic welding - Overflow installation!!" to StumbleUpon Submit "Acrylic welding - Overflow installation!!" to Google

Updated 03-02-2012 at 11:43 PM by pepper'scove

Categories
Tank Entry , ‎ Plumbing , ‎ DIY projects , ‎ Equipment

Comments

  1. pepper'scove's Avatar
    Marc, I can't figure out how to rotate my images once they're imported. If you could give me instructions (or use your magic moderator powers to do it for me) I would appreciate it. I hope you like the photos, they were taken with an iPhone 4 so that's why they aren't as high resolution as I might have liked... anyway guys, enjoy! Let me know if you have any questions/suggestions.
  2. Midnight's Avatar
    When you run them through picassa (free photo editor) or photo shop you can rotate during editing and then save it that way. I like the way your teeth are done. you really need to loose the metal clamps on the back side. They will rust in time. Did you drill the tank or was it already drilled?
  3. pepper'scove's Avatar
    Midnight. Thanks, I had fun designing the overflow and later today I might try your suggestion to use Picassa (afterall, who doesn't like Picassa clowns ). And yeah, the tank was already drilled (it has a tempered bottom which is why the holes had to be in the back wall instead of the tank bottom). I will be getting rid of all the metal clamps ASAP, but until I can get plastic ones ordered I decided to just use metal ones. This tank build has been a slow process and has been taking place for a little over a year. Everything from the stand to the sump and even the interior silicone of the tank as well as the work you see here, it's all stuff I've done. So for now the metal clamps will let me water test and run simulations and lots of different failure scenarios. But by the time I get fish in the tank they will be plastic.
  4. DJ in WV's Avatar
    Looks great Jeremy
  5. pepper'scove's Avatar
    Thanks DJ! And thanks for offering the use of your tools just in case I couldn't get the CNC to work!
  6. pepper'scove's Avatar
    DJ,

    Hey, I talked to Matt Goldberg today. He mentioned that you shop at Streetside Pets! He also mentioned that you were thinking about having your first meeting this coming Thursday. Depending on the time and when my fiancé decides to leave, I am planning to attend. Looking forward to it!!

    Jeremy
  7. melev's Avatar
    That overflow came out really nicely. You did a great job with it. I did some checking and I don't see how to change the images you attached. There's no option to rotate uploaded images, so you have to have them the right direction prior to uploading them.
  8. pepper'scove's Avatar
    Thanks Marc, I didn't see the comment you had made about using 1/4" acrylic before I got this totally installed... opps. Anyway, I'm glad you and everybody else seems to have really liked it! Also, since there's no way to rotate the images I may go back through this post and upload all the pictures again to replace them. It bugs me to have to rotate my head just to look at my own post... lol.
  9. melev's Avatar
    Yeah, I hear you. I did find out that if you double click an attachment, you can change the size in your entry. Large is really too big, but medium worked out well for a different blog I had to edit.

    1/4" is normally used, but since you glued this over glass 1/8" is fine.