

baker.shawn
DIY kalk reactor

by
, 03-01-2011 at 12:58 PM (3691 Views)
As many of us know Kalkwasser is one of the easiest and most affordable ways to add calcium and alkalinity to a reef tank as well as maintain pH in smaller heavily stocked aquariums and lightly stocked larger aquariums. about 6 months ago I decided to make my own reactor here are some pictures of the build process, if anyone has questions please leave a comment and Ill get back to you
--Materials
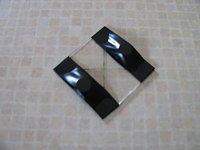
(1) Acrylic tube 4OD- 2
(3) ¼ acrylic 6x6
Various scrap acrylic
(8) Nylon wing nuts and screws
(1) Pc fan
Weld-on 16
(2) Rare earth magnets
(1) Stir bar 1 ½
(1) Old cell phone charger
(2) ¼ john guest fittings
silicone
**forgive me if I forgot anything
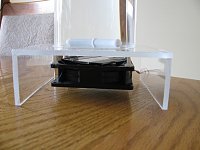
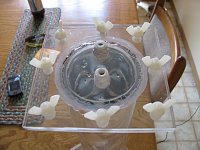
To keep my lime water saturated i decided to use a DIY magnetic stirplate what i found on a homebrewing website. I did this mostly because I did not want to have to mess around with pluming, unseals and maxi jets being clogged and or corroded
I really wish I would have taken pictures of the rest of the construction of the body but it was my first time doing acrylic welding so I wasnt really thinking of taking pictures. The base and lid of my reactor are both square for simplicity. I build two legs on my base to make room for where the modified pc fan would sit. Attaching the body to the base was straight forward. I cant stress how important it is to have clean SQUARE cuts, I ran in to problems here which will be in my conclusion
Creating the neck portion where the lid attaches was a challenge because I didnt have a big enough drill bit. I used a ¼ bit and my drill press to make about 40 holes in the perimeter of the 3½ hole I needed I then used the friction of the bit to melt the acrylic between the holes giving me a very rough 3½ hole afterwards I cleaned everything up with a drum sander it turned out great
To prevent leaks I used a thick bead of silicone (now replaced with a o-ring) sealed by the 8 nylon wing nuts and bolts, the process was easy and just a matter of lining up the holes. I did not have a tap to put a thread on the acrylic where my john guest fittings attached so I drilled a rough hole then heated up a bold with the same thread after working it in I let it cool before removing it, creating a pretty good thread ( I still used a bit of silicone around the fitting)
During the 6 months of use I found a couple problems with my design
1) Im not very good at making water tight acrylic welds, the fact that the tube wasnt cut square by the plastic shop didnt help
2) The stir bar keeps the kalk so well suspended it had to be put on a timer 5min every 6 hours
3) During the 6 hours the lime water and the fresh top off water coming in separate, to solve this I added a tube to the water coming in to the reactor to take it nearly to the bottom
4) The stir bar is beginning to wear away the acrylic, to solve this in my second proto type I plan on using a glass insert in the bottom
Over all Im very happy with the turnout, once I perfect the stir plate portion I plan incasing it in a projectbox and adding a potentiometer to control speed, i will also consider having a plastic shop build the reactor for me so that i can have the joints and welds done by a pro
once again if you have anyquestions just leave a commenti check the forums like 383847462626377 times a day so ill be sure to get back to you.
-shawn


