Snorkeler's Cube
Ordered the new hood...
by
, 08-06-2011 at 04:49 PM (1605 Views)
Thursday I put the order in for the new aquarium hood, with my favorite woodworking shop, LD Marcenaria (great quality, they built all my apartment to my design).
The sketch below shows the hood's design, it is high so my DIY LED fixture will fit inside it, with the controller and the power source above it (on the tray that crosses the middle). The controller is the glassy box on the tray, and the power source is the smaller gray box.
View from beneath:
Top view:
The controller is an Arduino Duemillenove connected to MOSFET circuits as drivers. I wanted to keep it simple and use parts I could easily find locally at a reasonable cost, even if that meant a possible sacrifice in efficiency (which I don't think happened, from what I've read). So the power source is a used PC ATX power source, capable of supplying 12V up to 15A.
The MOSFET drivers were designed with the gracious help of another reefer online who happens to be an electrical engineer (kcress at RC, great guy, not sure if he's also a user here), and the final design is this:
With only 12V I'm only able to drive strings of 3 LEDs at once, so I'm connecting the Arduino PWM output pins to several drivers in parallel, each driver driving a string of 3 LEDs screwed to a head sink (which I'm calling LED bulbs). One pin is connected to the white drivers, another to the blue drivers.
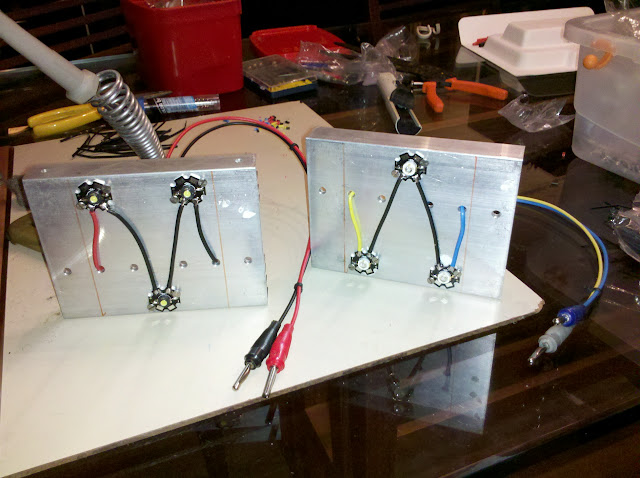
This is a picture of two of the LED bulbs (3 x 3W Super LEDs). The red connector one has white LEDs, the blue connector one has blue LEDs:
They will sit on top of this structure (actually, a later modification of it, with taller vertical columns), the structure does not include the heat sinks in the picture, those were the heat sinks that became the back of my LED bulbs:
The structure can hold 12 LED bulbs, but I built only 10 driver circuits (don't believe I'll ever need 12 bulbs as I don't intend to have SPS) and only 8 bulbs to start, 4 cool white ones and 4 blue ones. If they end up not bright enough I'll build another 2, and if that ain't enough I'll add two more driver circuits and build 2 more bulbs. With optics I think it will be quite bright. Hope to have the help of a local reefer with a PAR meeter to discover how bright (or not).
I'm writing the Arduino program with the objective of simulating weather. Haven't finished it yet, but I'm almost there. The code is hosted at http://code.google.com/p/arduino-rtc...ed-controller/
Delivery of the hood is expected for early September ... can't wait... anxious enough about it that I'm even blogging one month before delivery.
Did several past blog posts about this, all of them expecting to progress quicker than happened in reality... no wonder I'm anxious to see this completed...
Apr 3rd: http://www.reefaddicts.com/entry.php...ED-DIY-fixture
Nov 6th: http://rcsnorkeler.blogspot.com/2010...milestone.html
Oct 24th: http://rcsnorkeler.blogspot.com/2010...ing-built.html
Sept 16th: http://rcsnorkeler.blogspot.com/2010...h-1st-one.html